Finished photos of my Upton Party Dress

Finished photos of my Upton Party Dress

0755-copy

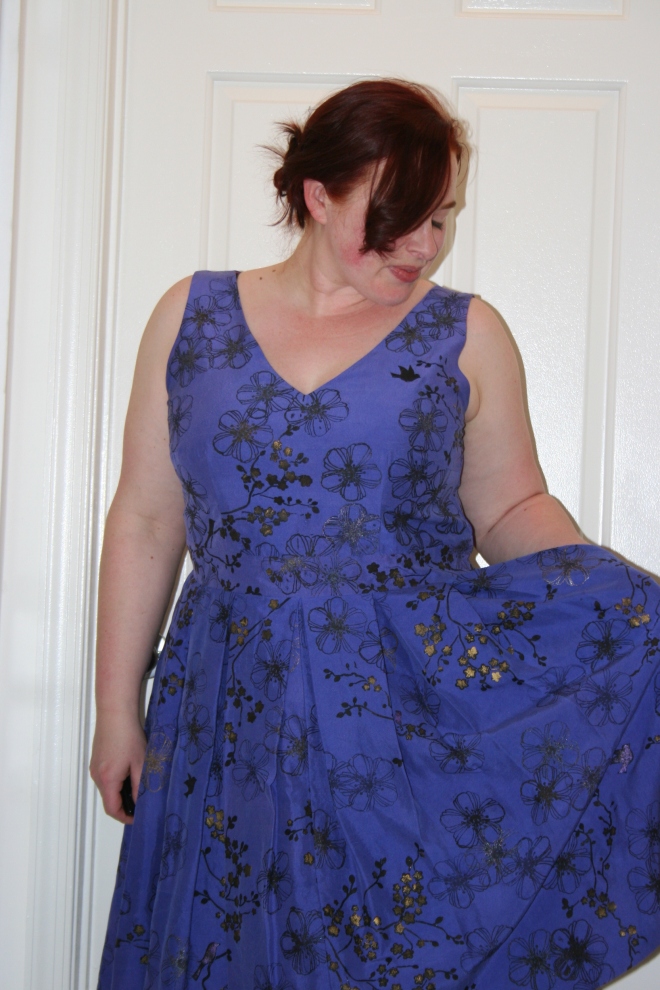
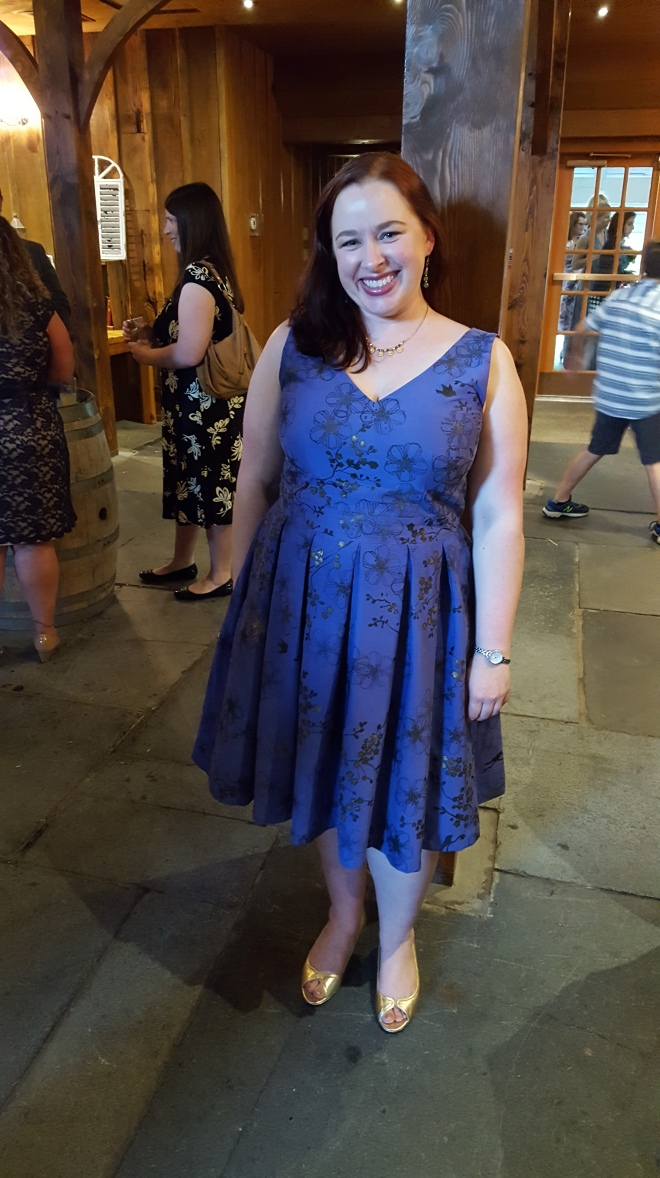
My Night Blooming Garden Upton dress worn both on my birthday and at my friend’s wedding. I love how it turned out, and I’m going to be making more! Hand-dyed and -painted silk shantung, lined in cotton lawn. (pay no attention to those faceless people behind me) Photo by Kelsey Christian.

Wow,  it’s been way too long between finishing this dress and posting final photos of it. Crazy pants! Well, there was a wedding (to which I wore the dress), and it got all sweaty from the ALL NIGHT DANCING!–and then it had to be washed (yes I wash silk), and then packed for a move, and I figured why press it when it was just going to be stuffed into a Spacebag? So it didn’t get pressed until a few days ago, and then I had to wait a few days to put it on and get photos. I am nothing if not a procrastinator.


Anyway, here are photos and final thoughts on my Night Blooming Garden Dress from the Cashmerette Upton dress pattern.

20160911_163230

Another shot of my birthday/party dress. Not the best angle, I didn’t have time to do my hair before the wedding what with all the running around to help out, and there are some fit issues apparent, but all in all, I felt great in my dress.


Now to the fit problems–they’re minor, but they exist, and I want to fix them for the next versions. First: there’s some gaping/bubbling at the front armscye. Definitely visible in the photo above. I think it’s due to the shape of the shoulder strap’s seam. It’s a bit V shaped, probably to accommodate those who are a bit fleshier in the shoulder than I am. Easy fix: just level out that seam.

IMG_8361

Armscye gap is gappy.


Second: It was probably a mistake to do no length adjustment through the torso. It’s not bad as-is, but it would be better if it sat a tad higher. I wanted it to sit at my natural waist, and it’s very close, but since my back waist is higher than the front (thank you, high/full hips), shaving off 1/4 inch to 3/8 inch from the bodice’s waist seam will likely be a better fit while keeping the waistband at my actual waist. The pattern is designed for this to sit a bit higher than the waist.

IMG_8365

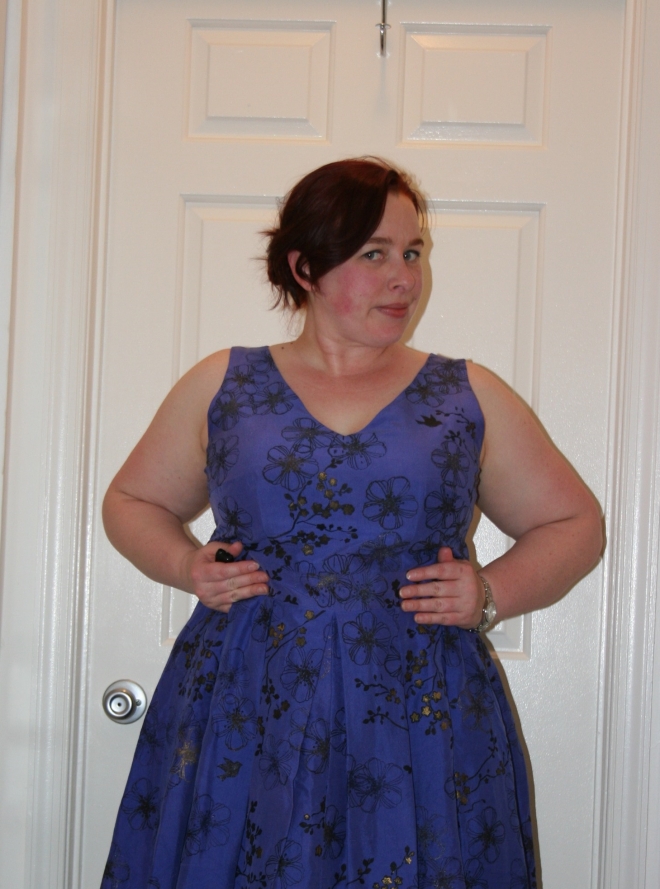
Squishing the waist upwards a bit. Yeah, I like this better.


And I think fixing the bodice length will also fix the bit of bubbling at the center mid-back that I’m getting, too. You can see it where the zipper bubbles out a bit. Without my high hip pressing up on that back waistband, this will probably hang more smoothly.

IMG_8402

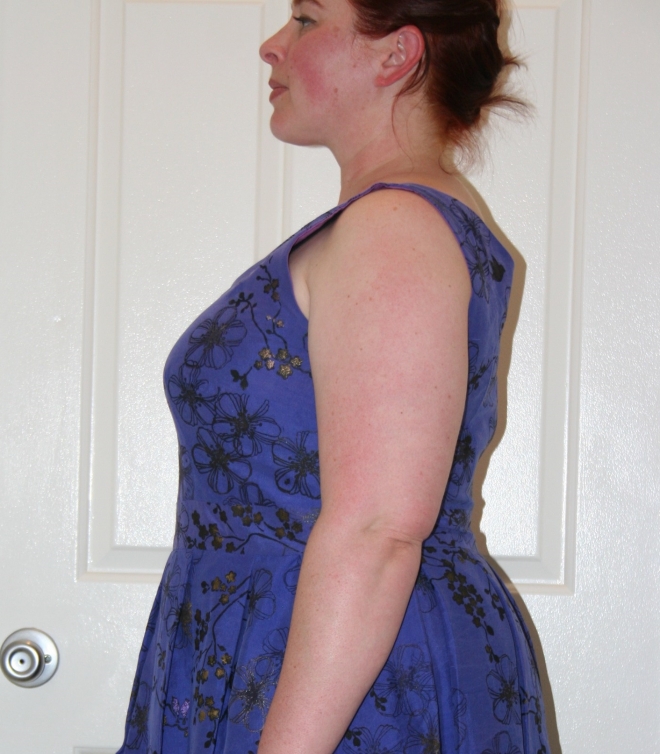
Just a bit bubbly at mid-back.


If I ever end up wearing this to another fancy event, I’ll probably wear a torso shaper thing under it, because once food hits my belly–out it goes! A little control never hurts. I am a firm believer in the benefits of shapewear. Not every day, or for every occasion, but sometimes.

It was so much fun wearing this dress to dance all night to a killer playlist in a beautiful venue with so many wonderful friends and acquaintances (and strangers)!

0921-copy

No, no–I’m not angry–just killin’ it on the dance floor with everyone else. Admire my dress, dancing peons! Too bad I don’t remember what song was playing. Photo by Kelsey Christian.


I love how the dress’s skirt swishes!

IMG_8379

Swisha-swisha-swisha!


Now, about this whole washing silk thing. It is totally possible, totally safe (presuming you’ve prepared your fabric correctly before sewing the garment–always pre-wash/clean the way you intend to clean the garment), and totally easy. Large mesh laundry bag. Gentle cycle. Cold water to prevent releasing any dyes. Baby shampoo. Yes, baby shampoo. Silk is protein, like hair. Baby shampoo is very gentle and doesn’t contain a lot of extra gunk that’ll mess up the fabric. Plus it smells really nice when it comes out of the wash. Better than a baby, even. You could substitute a textile detergent like Synthrapol, but that stuff smells chemically. Or use Woolite or something similar. But I stick with baby shampoo. Then just hang or lay flat to dry and press with a hot iron on a steam setting. Good as new!

I treat ALL of my silks this way: habotai, charmeuse, dupioni (unless the shimmer and crispness is really important for the project), shantung. *I probably wouldn’t treat silk taffeta like this, however, because it would ruin the finish, reduce the crisp hand and the fabric’s sheen, and probably soften it to the point that you’d no longer hear the ‘scroop’ sound as it moves.*

Anyway, thanks for looking and reading!

IMG_8394

French designer jacket project update

French designer jacket project update

It’s actually not so hard to believe that this Chanel-style jacket project has been sitting on the shelf for, hmmm, let’s see… just about 1 year! It’s complicated and ambitious. I don’t need it, but I would like to someday make it. The planning is done so there’s nothing but grinding work ahead.

Nevertheless, some progress has been made quite recently (read: this week). And all because the Chanel Jacket Club at work is now going to do a personal fitting session with the designer of the pattern we’ve all chosen to work with. Yay! This is too good of an opportunity to pass up. Fitting was always going to be the most painful part of the process.

But before I get into that further, there’s been a change. The Claire Shaeffer-designed pattern for Vogue that I was going to use (with its, like, 50-bajillion pattern pieces) was so overwhelming that I couldn’t even make myself cut out the pattern pieces. Then the club decided it would be better to make our first designer jackets with a simpler pattern, so we switched to this one designed for Susan Khalje’s Classic French Jacket web video class:

Print

Susan is a Threads magazine contributing editor and couture expert. She collaborated on the design of her pattern with a well-known fashion draper in Paris.

It has fewer moving pieces than the Vogue pattern and the princess seam goes into the shoulder, not the neckline, which will make bust adjustments easier. It’s designed without an overlapping closure in front; instead the jacket edges meet at center front and close with hooks and eyes. I’ll have to hack it to create a front button placket and a stand collar, because I still want those features. However, the rest of the work on this jacket, particularly fitting, promises to be surprisingly simpler than I expected.

That’s because when I made the muslin and tried it on, the bust apex level and waist level appear to be correct for my torso. This NEVER happens! (Well, unless it’s a petite-proportion pattern.) I don’t have any photos to prove this, so take my word for it. Some fitting changes will have to be made to the circumferences to accommodate my full bust, pudgy waist, and broad hips/bottom. The muslin ran long on me, too, hitting me about mid-thigh–which I actually really love! It looks much more modern than if it hit me mid-hip or upper hip as designed. I may want to make one to that shorter length, but for my first one, I’m going with the longer length. It’ll look killer with skinny jeans/leggings or tapered trousers. The sleeves were also too long and need some more circumference, but otherwise, the first muslin is a really good starting point.

What was not simple about this pattern, however, is that the sizing chart on the envelope gives the finished garment measurements–not body measurements–to choose your pattern size. This isn’t a bad way to do it, actually, because it makes it easier for you to decide how much ease you want to start with. But unfortunately, it is not explained anywhere on the pattern. There are no instructions at all, because it’s intended to work with Susan’s video class; but I don’t recall her mentioning the sizing system in her video, either. If she did and I missed it, my apologies, Susan!

Otherwise, the rest of the details of my jacket plans are the same. Same white-flecked black wool-blend fabric and charcoal-grey silk charmeuse for the lining. Same beautiful enameled pewter buttons with thistles on them. Same overall design concept.

chanel design 001

My design sketch. But now I’m thinking I’m going to extend the length to mid or upper thigh for a more modern look!

Now I can’t wait for my personal fitting so I can actually start making this jacket!


Upton Dress muslin

Considering that most of my major pattern changes are already incorporated into the draft, I shouldn’t be so surprised that only one muslin for the Cashmerette Upton dress bodice was necessary. I made a few small tweaks to muslin #1, but nothing that required a fresh mock-up.

Before sewing up the bodice muslin, I made a few size modifications to the pattern at the side seams, grading out from a 14 at the shoulders and bust to a 16 at the upper waist. Initially, based on the pattern measurements compared to my own, I used the size 16 for the back waistband, but for the front waistband I graded out from a 16 where it joins the bodice to a 20 where it joins the skirt, because I’ve got some tummy that I wasn’t sure the size 18 would fully accommodate. But I saw immediately that all this excess needed to come right back out when I put the bodice on and zipped it up. I pinned the excess at the waistband and it turned out to shrink it back down to a straight 16. Even with a more snug fit through the waistband, it felt comfortable when I sat; if you have any fleshy bits in your torso you know sitting causes that flesh to expand. So I ended up using a straight 16 waistband. There’s just enough ease for comfort.

The short, torpedo-shaped waist dart with its curved legs was problematic for me because my bust is set very high and its fullness is evenly distributed from top to bottom. This waist dart shape nicely scoops in the bodice at the torso under the bust, but it ends too abruptly for my shape. This would probably work best for someone whose bust is low-set and is fuller on the lower half. For my shape, I needed to extend the dart and create a more gradual taper toward the point, while retaining the arced dart leg shapes. Below you can see the original waist dart shape (the shortest one) and the two extended versions I tried before deciding on the tallest one. Yes, that puts the dart point very close to my actual bust point, but for a garment with minimal ease, that works ok.

20160819_110915

When I made the Appleton knit wrap dress, I didn’t do any length adjustments, and the dress’s waist hit me just above my natural waist, which was perfect. It was pretty much the same for this pattern. Jenny, the pattern designer, described Upton’s lengthwise fit as “the top edge of the waistband sits at the high waist.” The dress may be designed to be a tad short-waisted on a person with an average torso length, to rest above tummy fluff. My torso is short and my waist is pretty clearly defined, even with my fluff. I wanted the waistband to rest closer to my natural waist, which it did without lengthening the pattern anywhere. However, I did need to add about 1/4 inch length to the front bodice waist to make the waistline level, because mine dips a bit in front, while it tilts up in back. The pattern’s included swayback alteration was still a teensy bit too long for me, so I took it up an additional 1/4 inch at center-back, tapering it to nothing at the side seams.

One other area of fit concern was across my shoulder blades. I have a very erect posture (thank you scoliosis, childhood horse riding lessons, and yoga), and many bodices bag out at my upper back. Even though I’m using the V-neck back bodice sections for this dress, I needed to take a bit of volume out of the upper shoulder and center-back areas. I took a few tiny darts out of the back neckline to remove some of that bagginess. I’ll have to do this to the scoop-neck version, too.

All in all, this was an extremely easy dress bodice to fit! The built-in customized cup sizes, swayback alteration, and shortened torso made getting the fit right faster than any other bodice I’ve fitted.

I’ve cut all the dress sections from fabric, and now I’m working on printing them. More on that later!

My fancy-schmancy new dress form

My fancy-schmancy new dress form

I have a pretty cool dress form, and I’m not really bragging–I’m just totally jazzed about it. I got to go down to Washington, DC–my old stomping grounds–to this great little sewing studio/school called Bits of Thread in Adams Morgan.

At this studio, the owner and her partner have developed a really cool process for creating custom dress forms that pretty much 100% replicate your ACTUAL body. That includes your posture, your body proportions, and all your circumferences from neck to knee–and all your lumps ‘n bumps. I’ve only had it since February and already it’s been 5 times more useful than my standard professional dress form (which I never really found much use for, except as a display piece).

20160112_205230_resized

My custom dress form is a DittoForm. It’s made by scanning your body with a 3D imaging camera and then it’s machine-carved from foam. It is WAY cool. There’s an article all about it in the June/July 2016 issue of Threads magazine, so go check that out!

What’s so great about this custom dress form service is that it’s much more affordable, low-effort, and much faster than getting a custom professional dress form made. It isn’t perfect, but it’s so much closer to perfect than anything I’ve had before.

20160112_205311_resized

Yep. That’s my body. Gloriously imperfect and damned hard to fit.


I’ve done the Duct Tape dress form thing, and my experience with it sucked. It always titled on its curtain-rod pole and Christmas-tree stand base. Plus it expanded a bit in some places when filled with foam, and collapsed in others. And it wasn’t pinnable, or sturdy, or easy to move around despite being very lightweight. *Sadhorns*

I’ve owned a set of Fabulous Fit fitting system pads to make my other dress form resemble me, and my brain just froze every time I tried to start putting the pads in the right place. I know lots of other sewers have had great success with that system–it just was too much for me, because my shape is vastly different from a standard dress form: shorter, squatter, rounder, and asymmetrical. I’m not even sure the FF pads in one set would be enough.

I wanted a really low-effort, relatively affordable way to get a very close copy of my body, and DittoForm is it. It came out of the box, and I was a little spooked by how… ahem… ACCURATE it is. Like, I-don’t-want-to-leave-it-unclothed-in-my-living-room-when-company-comes-over accurate. (And that’s actually a possibility because my apartment is mostly a big open space, my sewing room is small and awkwardly sized, and the whole thing basically gets turned into a sewing studio when I’m in the throes of creation on more than one project at a time. So both dress forms live in my living room most of the time.)

20160123_110122

Super-realistic shape and proportions. You can even see a bit of my asymmetry here in the way the form’s right shoulder (on the left of the photo) is a bit squarer than the left shoulder, which slopes a bit more; that’s my scoliosis showing.


Anyway, I’m looking forward to actually using a dress form now, when before it was this big thing sitting in the corner taunting me with its un-usefulness. Yay!